We are currently undergoing maintenance - thank you for your patience

Fall is only a month away and that means the holidays can’t be too far off. And we all know holidays mean family and visitors that most likely will want to bunk at your place. But what if your home isn’t ready for visitors? Don’t fret, Hippo friends—we are here for you with our top 10 easy fixes to get your home ready for those holiday-time home crashers!
1) Make sure you have plenty of hooks! Though this one seems simple think of that huge coat pile that will undoubtedly end up on your bed if you don’t have enough hooks for coats, purses, hats, etc.

2) Check those door handles and make sure they are set correctly on the spindles lest they break at an inopportune moment. No Aunt Phyllis stuck in the bathroom this year!

3) Speaking of doors. It’s time to check on/replace those springs in your mortise locks. Heaven forbid it breaks and now your door won’t lock. Your guests and family will thank you.
4) Do you live in an old home with NO lock on your bathroom door? It might be a great time to add a simple slide bolt to keep those knock-while-entering visitors at bay.
6) You’ve got a gorgeous light fixture but it’s broken, and sure, you will get it rewired someday. . . but man that would suck if you wait too long and it burned the whole place down. There’s no time like the present to drop a little money and get that puppy UL certified! Safety first, friends.

7) Are your guest rooms dark and gloomy? Add a beautiful vintage lamp and give your guests some reading light so they aren’t keeping you up all night instead.


8) Guests and visitors mean time to stock up on bathroom accessories like towel bars and soap holders! God forbid your cousin and her kids pile all their wet towels on top of yours. Gross.

9) Make sure those hinge pins (especially on your bathroom doors!) are tapped down as you wouldn’t want your doors falling off. . . at the inopportune moment. And while you’re at it, replace your ugly boring hinges with beautiful vintage ones.
10) Who needs more mirrors? You do! So do your guests! As Mary Poppins says, “A thing of beauty is a joy forever.” She’s probably quoting someone else, but the point remains: a beautiful vintage mirror adds that practically perfect touch and every room needs at least one.
Want to know the best thing about this list? You can find everything (and so much more) at Hippo Hardware! Plus our experts are here to give you advice whether you want it or not, helpful hints and tips and general emotional support as family-time draws near.

Since the spindle kit is one our best selling items, we felt it merited a blog post to explain the increase in our price from $10 to $20. Our wholesale costs rose dramatically these past few months due to (we've been told) the price of steel. We'd like to offer a few options:
1) Our original threaded/tapped spindle kit which is great for saving lovely old doorknobs on a threaded spindle. See our blog post all about how to fix antique doorknobs here. These are still our favorite option, but the cost is higher.
2) We have started carrying a less expensive reproduction straight tapped spindle kit. These will function the exact same as our threaded/tapped spindles once your knobs are mounted. Getting them on, however, might be more difficult depending on your set. These spindles do not have any threads so if you're using them with a threaded doorknob where the threads are damaged, you may have to file out the remaining threads to get this spindle to work.
3) Threaded spindles (thread 16, thread 18, and thread 20) which work if your threads are still in good shape however you will need to know the thread size in your knob. Our wholesale on these spindles has not gone up so the prices remain much lower.
Thanks for your patience while we've gotten this sorted out. Please keep us posted on how best to help you our with your projects.

Here at Hippo Hardware, re-purposing discarded material is a pillar of our business, a personal passion, and a stylish way to include the past in our modern lives.
A favorite starting material for many of our customers is a salvaged door. Not only does a door make a great statement piece, but the quality of construction are rarely matched in our modern era. With some delicate sifting, we would love to share some of our favorite projects!
Hall trees reached their peak of popularity during the Victorian era. Although they can be difficult to find today, a DIY version is easily within reach.
With a few doors, some gorgeous vintage hardware, and a little elbow grease, a stunning and practical hall tree is made. Add a mirror or a shoe rack to organize your entry space!


With the same convenience as standard lumber, doors can also be used to craft some amazing seating options. From a cottage style, deep sitting chair to a wonderfully weathered swinging bench for your patio, the possibilities are truly endless.


We love this innovative yet the simple design by far is a hanging table suspended by vintage styled hemp rope.

And don't overlook doors for a statement DIY coffee or end table. You can impress your company and customize it to your personal needs and space.


A simple slice down the length of a 4 or 6 panel door creates the perfect ends for an elegant, stylish bookcase. Creative organization can easily be conquered with some simple planning.


Both glass and solid panel doors can be suspended from the ceiling to create amazing room dividers!

Alternatively, hinge doors together for a folding screen using whatever doors fit your fancy. Great for photo shoots as well!

Whether you call them barn doors, stall doors, or sliding doors, a rail and matching hardware quickly turns any door into the centerpiece of your creative space.


Some antique doors have a great place for an inset for a mirror. Selecting a door with unique character is always best. You can guarantee everyone will be looking right at it!


Yet another beautiful use for the inset panels of a door are chalkboards or corkboards. This popular and affordable DIY project is easy to personalize for your own space and needs. Chalkboard paint along with corkboard can be obtained at most hobby and craft stores.


Whatever your DIY project is, our architecture department is a treasure trove of materials ripe for re-purposing. We’d love to help you get your next project started or help you find that finishing touch so bring us your ideas, pictures and let us help you bring those DIY dreams to life.

So, I was recently having a small conundrum: I want a No Soliciting sign on my door but I just don't love my options out there. I have heard many customers expressing the same sentiment and I just today figured out a solution I'm exciting about - label holders! Yes - perhaps it seems obvious now, but I just realized how awesome and varied label holders are and how easy it would be to make my own attractive sign. I chose a large one because my front door is up off the street and I'd prefer folks get the message before ascending my stairs.

Personally, my handwriting is atrocious (thank god for the keyboard, I say) but I have friends who know how to make pretty things. Likewise you could paint something, print something, or type it on a typewriter. So many great options! Here is what I ended up with:

My very talented friend Thea Gahr made painted this beautiful sign with watercolor. I absolutely love seeing it every time I come home. We did have a slight misunderstanding which is why the sign is a big smaller. I did decide to laminate the sign both to preserve the art as well as make up for the space between the frame and the sign.

Setting it up was easy as pie - just mount the label holder to the door

Cut the sign to size

And then slide it into place (my frame was slightly open on the top which is the most common).

This structure would also work great for other signs, such as: Please Remove Your Shoes, Please Turn Off the Light, or Thank You for Not Smoking. Most label holders are much smaller - around 3" x 2". We have some great label holders online right now - this copper black japanned one, this classic brass one, this lovely and unusual iron Victorian one, and this fantastic arts and crafts brass guy.
Anyone out there have some cool DIY signs they've made? Post them in the comments below!

es·cutch·eon (aka. door back plates)
/əˈskəCHən/
noun: escutcheon
Origin: late 15th century: from Anglo-Norman French escuchon, based on Latin scutum ‘shield.’
No matter what you call them by, we have a huge collection of stunning pieces. Ranging from ornately decorated Victorian to stream-lined art deco and everything in between, Hippo has your era covered.
They truly don't make them like they used to--this late 1800s Victorian-era escutcheon boasts an intricate design and a key hole cover:

This Victorian "reole" pattern piece has tiny carved roses, scroll work and elegant lines:

This piece is from approx 1910 and has a japanned finish:

These craftsman/mission styles are minimalist yet stately in both shape and design:

These art deco pieces are iconic in both design and shape with their tell-tale stream-lined yet glitzy details from the 20s through the 40s:

This art deco has a lovely sunburst-like pattern:

Unfortunately the intricate patterns and classic styles were only made through the 1940s. This classic mid-century escutcheon and door set has become the new modern standard.

A far cry from this row of design and craftsmanship:

(DIY hint: don’t want to use them on a door? Use them as a backplate for hooks or anything else you want to display!)


We answer a lot of calls here at Hippo with questions concerning Claw foot tubs, and they usually lead to more questions. So, here’s my little clawfoot tub primer of do’s and don’ts if you are considering upgrading to one of these irresistible beauties. They can that be picture perfect luxurious soak you’ve been dreaming about.

#1: While it’s not impossible to find feet for antique tubs, it may be impossible to find the exact four feet, or missing foot, that connects to your tubs unique bracket and profile. Each maker had their own unique casting. We estimate there are somewhere around 400 different castings. On some tubs, the back two feet are be a little taller for proper tilt for drainage. So, rule number one, buy your tub with all four of its feet. However, if you already bought a footless tub, all hope is not lost. The best way to find out if we have feet for your tub is to bring your tub in. We realize that's prohibitive for some folks so a good second option is to press some soft modeling clay over the entire surface of the leg mount and make a mold.


#2: Weather and harsh chemical cleaners are not your tubs best friend. Storing a tub outdoors in the elements is a bad idea, buying a tub sitting in someone’s yard an even worse idea. That beautiful pristine porcelain finish is thin and porous at a microscopic level. The harsh environment of rain and winter degrades the surface, and you may be left with stains that have permanently damaged its originally glossy appearance. Additionally the iron may be brittle from the extreme temperature changes and humidity.

#3: Once you have your dream tub, make sure it stays dreamy with proper care. Harsh chemicals can damage the porcelain and end up causing more harm than good. Here’s a great resource from Apartment Therapy on the care and cleaning of your antique tub or sink.
#4: If you need to restore your tub's surface, leave it to the professionals. Home kits often leave a less then stellar surface, that becomes even more problematic over time. The biggest key to a successful refinish is a totally sterile environment. Any dust or particles will keep the chemicals from bonding with your tub's surface. Be aware that if you buy a tub that has a failing re-finish, it will cost a little more to have it stripped and re-surfaced professionally, but well worth the money.
Those wonderful claw feet that we all fell in love with, can also be given a new lease on life in the hands of professionals. Remember there’s no shame in having a love affair with your well-worn tub either, with their numerous coats of paint on the outside, scratches, rusty feet and all. After all who’s perfect?

#5: Another thing to consider is the space your working with, I’ve seen many regrets over the years, from people who could have had a larger soaking tub, but went smaller. Sizes on tubs range from 54” all the way up to generally 6’. As a rule, we recommend you buy the biggest tub you can comfortably fit in your space, your aching bones will thank you!

#6: Let's talk about valve placement: there are few standards in plumbing, and tubs generally come a few different ways to fill with water. By far the most common style has the valve mounts to the inside surface of the tub with the drain directly below on one end of the tub. There are a few other unusual styles as well such as valve holes are in the of the rim or in the center of the tub. Most tubs have a mounting hole distance of 3 3\8ths. The valves we sell range from cool old antique tub fillers, to basic reproduction valves with a diverter, to fun valves with porcelain levers and a built in hand shower. So many options!

#7: Wanting to re-tile your bathroom? Thinking about adding some tub coasters? Make sure your plumbing drain and supply lines will fit the new height! Although needing to go shorter may add some time, ensure you include that in your schedule. If you'll need a longer drain or supply lines, definitely factor in replacement parts as part of your costs.

Are you ready to dive in now? We have many antique claw foot tubs in the store to choose from. Or maybe you just need to accessorize your little gem with some porcelain tub coasters, or an over the rim soap holder (or maybe two)? Let us know how to get your clawfoot tub dreams up and running!


There’s nothing quite like a chandelier. Their romantic elegance and wide array of designs provide endless possibilities for home décor.
As the summer winds down and the outside lights sheds a golden hue why not try a chandelier outdoors for those late-summer dinner parties, gatherings and events?
Go classic with a glass armed design. This look is perfect for any covered patio:

Or for a rustic look, try a DIY pulley light fixture:

Don’t want to mess with wiring but want an eclectic look for your outdoor space? A fresh coat of paint and a trip to the garden center turns these Williamsburg chandeliers into planters!


For a simple statement, try a glass globe shade candle holder (note: do not use real candles as they can explode the glass—flameless candles are best for these shades).

Of course, if an outdoor chandelier doesn’t work for your home, you can always go classic and add one inside for a traditional elegant statement piece like these many armed beauties that abound in our store:


Any way or where you hang it, a chandelier is certain to add a romantic and unique ambiance to your living space.

Located on SE 14th, snug between Burnside and Sandy, the Caldwell Funeral home stood elegantly from 1929 until 2017. Hippo had the privilege of salvaging some of the architectural gems from this incredible place. We were able to be one of the last few people to walk through the building. We would like to use this blog post to pay tribute to a gorgeous building with a long history in our city.
The building was stately:


Photos above credit: http://www.portlandchronicle.com/funeral-home-86-years-old-faces-demolition-190-units/
The inside however, was just stunning:


The images above are from the ground floor. Our first trip in, we were taken through the basement where all the mortuary work took place including an autopsy room and a cremation room. Unfortunately, when we came back with the camera, the entire floor was closed off for hazardous waste disposal so dear readers, we can only try to sketch the beautiful austerity of these rooms.
Most of the salvage we handled went directly to a large restaurant client but we did end up with this remarkable bronze fountain:

and we still have one of three steel gates:

We also nabbed a kitchen sink, iron driveway gates, and walnut inlayed light switch plates which have all sold before we had a chance to sit down and write about it.
Although it's a little sad, here is a final shot of the last day of such a grand old lady. It took an army to bring you down, you tough broad!


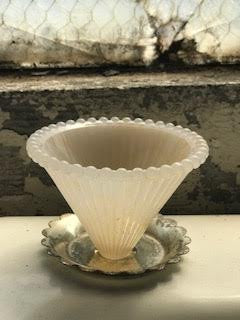
These days I find myself wanting to turn everything (and I mean everything) I see into a tiny plant container and/or a bud vase to hold flowers from my garden. My hobby of re-purposing anything vintage that looks like it could hold a tiny, adorable succulent has crossed the line into obsession and with the recent trend of entire terrarium stores popping up in PDX, it seems the general population shares my affinity for tiny plant culture.
These projects are so satisfying and here's why:
I could go on. Truly.
*All the items I'm using are from our vast lighting department
Here's what you will need to create your tiny plant container and/or bud vase:
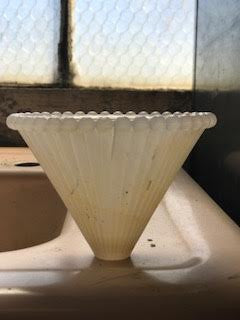
1) A small item with an opening. Like this for a bud vase:
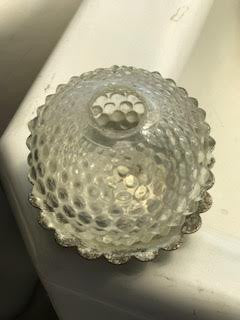
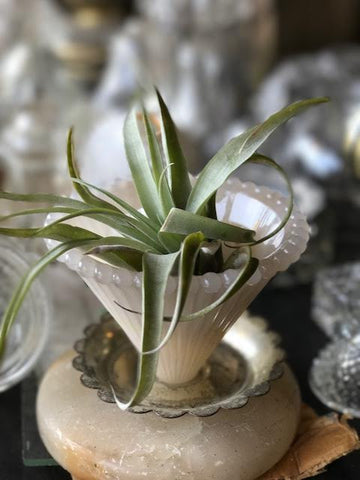
Or this for a succulent/air plant container:
2) A small plate or flatter surface to attach the container part to. This can be optional or necessary depending on if the container part has 2 openings. But it provides a sturdy base and will allow you to use a wider variety of items.
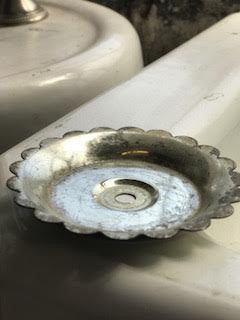
(Note: this particular piece is part of our vintage lighting collection and does have a hole at the bottom. This can easily be covered up with some tape on the bottom and glue to fill the hole in.)
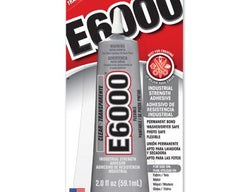
3) Glue--I recommend E6000 craft glue. You can use super glue but the E6000 is better and works on many different materials. You can find it at most craft supply stores.
Directions:
Step 1: Glue the container part to the flat/plate part.
2) Wait for it to dry.
3) Fill it with adorable tiny plants.
That's it.
End results: adorable and one of a kind!
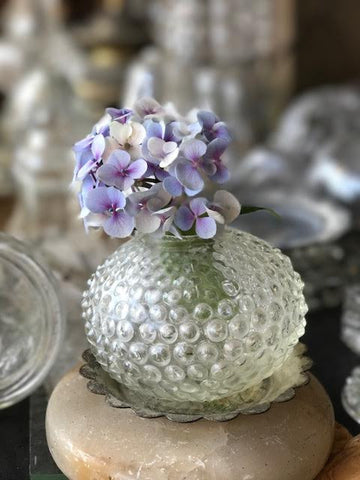
The best part about this project is the shopping for the components. Maybe you have something at home that you've been saving but if not, it's a great excuse to get out to the local salvage store and explore the possibilities. And then you get to go plant shopping too! So get to it. go DIY something adorable and unique. Go re-purpose the heck out of that vintage hobnail milk glass thing you've been eyeing.

Picture Hanging with Moldings
With the explosion of inexpensive artwork during the mid-1900’s, picture hanging styles changed. Starting around the 1870’s, Victorians arranged wall decorations and table settings as “art units.” The dioramas, if you will, consisted of half-a-dozen framed chromos, family portraits, silhouettes, or hanging plates- arranged over a set of standing easels covered in more artwork. The easels were sometimes flanked by a table or a draped étagère, and filled with porcelain figures, tintypes, folding frames and other souvenirs.

No matter how humble the collection, “art units” gave homeowners the opportunity to display their prized items. This was also a convenient technique for compensating for poor lighting, as a group of frames and art objects could be illuminated by fewer light sources.
Hanging pictures in “art units” were typically randomly arranged, with varying patterns of wire. Pictures hung up high were usually tilted downward towards the viewer below, while lower frames were hung flat against the wall.
 A When the wire is attached to the top of
Art units began to dissolve with the introduction of electricity in the home. Suddenly, light was spread more evenly throughout a room, resulting in the individual orientation of artwork on a wall. Directing a light source on an independent piece became much easier. As the novelty of purchasing hundreds of different pictures wore off, homeowners graduated to exhibiting more self-control in the volume of pictures and trinkets displayed.

Through the 20’s picture molding was a stock item for millwork houses. However, with the Colonial Revival in architecture, ceilings lowered and “modern” decoration branded visible picture wires hopelessly Victorian. By the 1930’s, frames were hung on invisible wires and eventually on nails and hidden hangers.

Luckily a large number of original hangers still exist, preserved for your present-day interior design.

Hippo Hardware stocks a collection of original and reproduction picture hangers- available in every metal type and a variety of shapes and sizes to match your aesthetic. We also carry 11 colors of cord (60lb test) to add a professional, finished look to your frames. We are more than happy to assist you in coordinating the perfect combination for your home! 

|
n. |
1. |
A composition made from blood, mixed with mineral or vegetable substances, used for making buttons, door knobs, jewelry etc. |

With the growth of slaughtering and butchering trades in the 19th century, disposing of large quantities of blood became an issue. You literally couldn't give the stuff away! London butchers in Newport Market were banned from tipping blood into the sewers as it would attract rats. Luckily recycling was already a common practice: phosphorous matches were made from ground bones, tobacco ash was re-purposed into tooth-cleaner, and desiccated fish eyes were used for the buds on fake flowers- delightful!
These innovations were a catalyst for creative approaches to blood disposal, as a headline from the January 1892 issue of Manufacturer and Builder magazine suggests:
Door Knobs, etc., from Blood and Sawdust.
Invented by Dr W H Dibble of New Jersey, Hemacite is a material made from sawdust and the blood of slaughtered animals. Primarily from cattle and pig, the blood and sawdust, combined with 40 thousand pounds per square inch of hydraulic pressure and chemical compounds, transformed into surprisingly durable and beautiful everyday items.
This composition was pre-plastic, and ideal for everything from doorknobs to roller skate wheels to products such as buttons, cash register keys and even jewelry. The composition of Hemacite was touted as susceptible to a high polish, impervious to heat, moisture, atmospheric changes, and practically indestructible.
An article “to skate manufacturers and dealers” in the New York Times, on 11 October 1885, stated that “the superiority of our Hemacite Roller over boxwood is now well known.” The success of the campaign spawned other articles like a 21 February 1903 Times ad by the Siegel Cooper department store, promoting 75-cent roller skates with Hemacite wheels, a more expensive option than skates with “plain black wheels.” Strangely enough, these adds were often juxtaposed with plugs for products like Plasmon Cocoa Mix- “A blood-invigorating and muscle-making beverage of the highest order.” Plasmon’s active ingredient was Albumen, the organic binding agent behind Hemacite roller skate wheels. Clever marketing or a dark sense of humor?!
At the time of the Manufacturer and Builder article, Dibble Manufacturing Company had been producing Hemacite architectural details and door knobs for quite some time. Rather than having a separate knob and shaft to wear out, Dibble’s knobs were molded as one unbreakable piece, and came with a guarantee for the lifetime of the door.

Due to its consistency, Hemacite is easy to confuse with Bakelite. Even cheaper to produce, the popularity of plastics like Bakelite almost entirely replaced the production of Hemacite by the early to mid-1900’s. Ever strong and durable, these house fixtures and doorknobs live on today- you can spot several in our nationally registered museum case at Hippo Hardware, and on occasion we will get a few in for sale. Talk about a real “conversation piece” to adorn your home!


